


You made it past the title; congrats! I couldn’t help myself and now (only semi) apologize.
Considering I enjoy helping others attain their environmental and/or pretentious hippie goals (with monetary savings peppered in), I figured a post on cloth diapering was at least 90 percent warranted. If you’re thinking about going reusable with your own pooping potatoes & tiny drunk adults at some point in the distant / near future, or if you simply find human waste and a professional patchwork of charming textiles intriguing, well, this is the place to be for the next few minutes of your life.
In Reddit terminology, I’ll provide you with a “TL;DR” (https://en.wikipedia.org/wiki/TL;DR) first. Full explanations and ridiculous commentary are provided below this list.
- Cloth diapering is *extremely* cost effective.
- You will get used to handling your child’s “by-products”.
- Diapers exit the laundry sparkling clean with no issues, as long as you launder properly.
- Parents have experienced a quicker path to potty training when cloth was used.
- Invest in cloth now, use on future children later (and/or sell).
- We experienced poo leaks in disposables, but never in cloth.
Now then, the fun begins…..
Our journey to reusable diapers all started on a crisp fall evening in the year of 2013, whilst I was experiencing the typical myriad of first trimester symptoms. I turned to my Stevie Bear and asked what he thought about “cloth diapering.” Before the last syllable passed my facial orifice, he expressed an aversion to the subject.
Some time passed. The leaves began to change, the ever-cooler winds swirled through the lands, and Americans geared up to legit slay each other over moderately discounted goods on Black Friday (cyber Monday, anyone?). It was during this time frame that Steve approached me with some research he had done: cloth diapers would end up saving us *thousands* of dollars, even with the cost of extra loads of laundry factored into the equation. Forreal, folks have done the math, including variables like washing machine and dryer electricity usage and the cost of the additional running water. Nothing came even close to the cost savings of cloth diapering (short of nakey babies discharging themselves willy nilly into their surrounding atmosphere [[although, I supposed you’d spend a chunk on replacing carpets]]). This tickled me in hues of pink not even The Mean Girls could comprehend. I got to try out a cloth diapering adventure “mostly for financial reasons” ;-), and it would be a benefit to the world’s overloaded ecosystems. The world that I’d desperately love to preserve for my little ones. Adding to the already-overflowing landfills that their generation will have to seriously mitigate one day, in order to diaper their very own butts, seemed quite illogical to me.
The backstory is set, and you’re eagerly awaiting how in the heckle to go about cloth bum-ing a baby, yes? Here are a few points to consider and/or remember:
- You’ll probably be overwhelmed and not know where to begin. I was there once, and I am there no longer. If you are truly interested in providing your family with a more eco-friendly and cost saving path to diapering, you’ll figure out what routine works best for you and feel comfortable and competent after a few days or weeks of practice. People may tell you this (they told me this) and you may not believe them (I did not believe them), but it’s true.
- You will, most likely (I’m sure there’s a 1% out there), grow accustomed to deal with the more…. unsavory….. aspects of reusing a diaper from a dirty bum. Seeing as I once wiped “waste” from prairie dogs’ bottoms for weeks on end during my college internship (that’s a black tie affair icebreaker, eh?), I was not queasy at the thought of dealing with similar products from my own children. However, I completely understand if this is unappealing to you. I have spoken with a number of folks who felt uneasy pre-cloth, and felt completely different once a few weeks had passed. When in doubt, repeat this mantra to yourself while you hold your nose and cringe at the item in hand: “money, money, money, money….” or any variation of cost saving / earth friendly phrases.
- Cloth can be used for multiple children, so whatever investment you make now you won’t have to make in the future. If one child is the route, you can also sell your used diapers and reclaim some money spent!
- We found that the Alva brand (adjustable pocket diaper) is inexpensive, effective, and adorable. Add a few sets to your shower registry, and you’ll spend even less at the start! Take a peek, here: http://www.amazon.com/Fitted-Pocket-Washable-Adjustable-Inserts/dp/B00C7JW2R6/ref=sr_1_9?ie=UTF8&qid=1444576814&sr=8-9&keywords=alva+cloth+diapers ****NOTE- We do not receive any kind of compensation from promoting the Alva brand of diapers. This is good news for my audience; you can trust this review to be completely honest. I’m only in the “business” of helping those who are interested.
- Check your area for shops that sell gently used cloth diapers. I’ve frequented The Nesting House in Collingswood, NJ, and found several barely used diapers to add to my collection. No stains, no signs of “unfavorable past events”, if you know what I mean. Facebook groups and websites also exist for this kind of buy/sell/trade diapering bonanza.
- If babe is exclusively breastfed, you can put all soiled diapers directly into the wash. You do not have to adjust your glasses or ask a friend to read the previous sentence because you don’t fully understand what it meant. Legit: you can take a completely dirtied diaper and throw it in the wash (laundering details to come later) without scraping anything into the toilet. This is because waste made up of Mama’s Milk is water soluble and rinses from the diaper with a simple pre-wash cycle. How sweet is that? Perhaps the wrong adjective there, but Steve and I were grateful for this. For the first 6 months of cloth, we scraped nothing into the toilet before a trip to the washer. Somewhat side note- if this grosses you out, remember that cloth diapers get a pre-wash and a nice, long sanitary cycle. They come out sanitized and practically sparkling, and there’s no trace of unfavorable particulates left in the wash. Step outside conventional, “socially acceptable” lines, and you’ll find some valuable rewards that typical Americans miss. Ah, I could apply that thought to many future blog topics… lol.
- We have experienced moisture leaking, typically from around the thigh area. However, we’ve never once had any amount of poo escape. I cannot say the same for disposables. (…ugh)
- You may not be able to use cloth right after birth. Firstly, life will be insane. Adding another unknown? Not advisable. We didn’t start really digging into cloth until they were about 2 months old! Our twinnies were small and, although we used prefolds and flats for a while (easily research-able, but I won’t go into detail here), we strongly preferred pocket diapers and waited until they were big enough for consistent usage.
- Even at 1.5 years (edit: 2.5 now!), we don’t use cloth overnight or any time they develop a diaper rash. Conventional creams cannot be used with cloth, as they prevent the fabric from absorbing liquids in the future. We do, however, use coconut oil with cloth to keep the precious-ist of baby skin soft and moisturized. There are also other more natural options that can be used with cloth- feel free to search around! In addition- some parents experiment with “double stuffed” (I know, I know… a phrase reserved for the delectable centers of chocolate, crispy wafers. Not a patchwork of poo-catching materials) diapers, i.e. two liners used in one pocket diaper during the overnight sleeps. We have yet to try. (Edit: We have tried, and it was hit or miss for overnight leaking. We actually double stuff at all times now, as they can produce more fluids at 2.5 years old).
- Breathe. There’s a ton of info and misinformation out and about that might scare you away, but I plan on laying out my experience here step by step. If you choose the Alva pocket route, I gotchu covered.
Ingredients:
~ A diaper bin. We love the Dekor brand we have. One for disposables, one for cloth. Labeling the bins helps avoid any confusion at 3 am and a disposable surprise when it’s time for laundering them. I’ve never done such… heh heh heh *gazes about nervously*

~ A diaper bin reusable insert. Two, preferably. While one is in the wash, the other is ready to roll.


~ Wet bags (optional). We bought 3 on sale wet bags from Babies R Us for when our daycare started using cloth (side note: HOW AWESOME??). They put dirty dipes in a wet bag every day, and we easily wash them at home. These are also convenient little pups for cloth-ing while outside the home on day trips and the like. Amazon has great choices.

~ Coconut oil (optional). As mentioned above, a pinch of this ingredient provides moisture and protection to a little’s bum and won’t cause absorption issues with cloth. One may find a jar o’ the stuff at many-a-grocery store these days. Even Walmart! At a typical room temp, coconut oil is solid. When warmed or touched, it turns to a liquid. Either way, it can be rubbed into a bebe rump for incredible, natural protection.

In this next segment of Jeli’s “Scoop on Baby Poop” (I’d apologize again, but I just love the word poop, so #srynotsry), I’ll go through our daily cloth routines. The thought of cloth-ing two babes at once was no small stressor for me during that last month of pregnancy, even though I knew I wanted to do it. Especially due to the fact that my knowledge on these dipes cut short at “wow, those Alva diapers sure have some cute little designs…. neat-o”. As such, we’ll start with a step by step review on how to stuff an Alva pocket cloth diaper and what to do with it after it’s been…. broken in…. by your child’s intestinal tract.
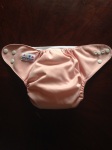
- (For the purposes of this manual): Buy Alva brand pocket diapers, perhaps from the link above. Here is shown a delightful model:
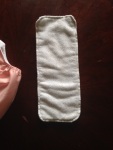
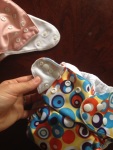
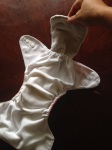
- Below is your new friend, called the microfiber insert. He/she should come, with accompanying buddies, inside the Alva packs of diapers.
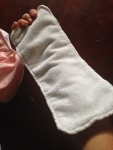
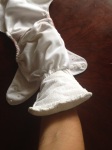
- To begin stuffing, I find it easiest to lay an insert on my arm, as shown below.
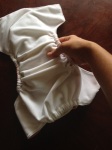
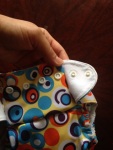
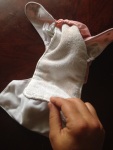
- I then stick the insert into the “pocket” of the diaper. Not incredibly easy to depict this action whilst also taking a photo, but I attempted nonetheless. You’d obviously have your other hand available to pull the diaper up over your microfiber-lined arm.
- Flatten out any bumps, lumps, or folds that may have emerged inside the pocket.
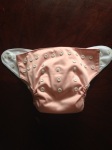
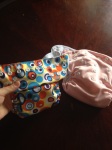
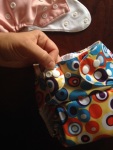
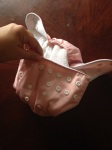
- Whoa- a wild polka dotted variety has appeared! Anywho, the polka dot dipe shows how this brand can be snapped down 1 or 2 rows to fit a smaller baby. Perf.
- When you want Little One to don the diaper, begin with the snaps that are the second row from the top. There are four snaps on each side for increased adjustability.
- Next, choose snaps from the top row. Try to get a snug fit on bebe’s thighs and waist, and make sure that no pieces of the inside is showing (moisture could come up the inside and onto the clothing).
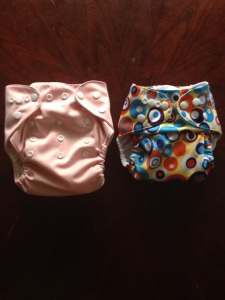
- End of quest. Almost. Below are two diapers, each snapped for different babe sizes. Mine were once smaller than the size on the right??? Nope… denial.


“We’ve stuffed the diapers and snapped them to our child. NOW what do we do??” I get this all the time. My only advice is to wait; food and drink take some time to travel from facial orifice to other bodily outlets. Jk. But now I shall detail the “aftermath” portion of this post. I promise, it’s not that bad.
- If only a pee-filled diaper, skip to step #2. If baby is exclusively breastfed and poo’ed, also skip to step #2. If neither of these situations apply, make sure to flush solids into the toilet. We typically use one of the dirty wipes to assist in this task, if needed. Some folks purchase diaper sprayers that attach to the toilet system. We did not, but I have heard good things about them. Once the large majority of solids have been flushed, you may proceed to step #2.
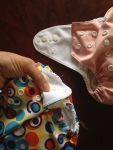
- Pull out the insert from the main part of the diaper. In order to minimize touching the insert, I pull it out with my dominant hand while holding the main piece in my other hand. I’ve attempted to demonstrate this here (imagine my left hand is cupping the diaper from below).
- Now that the majority of the insert is laying on top of the main part of the diaper, you can use both hands to loosely fold it over and toss into a wet bag or cloth diaper bin. The purpose of these steps is to ensure that all parts can freely move around in the wash.
- Diapers can sit in a wet bag or cloth diaper bin for 2-3 days before a wash. Much longer than that, and your neighbors may phone the EPA wishing to report a hazardous plume emanating from your property. I prefer laundering diapers every other day, but there have been plenty of times when we’ve stretched to 3 days, and only once when we accidentally went longer than that (one week! oops). Nothing was damaged, but it’s a great practice to stick to 2-3 days. Baking soda can also be used if you notice an odor from the bin. We’ve never noticed anything too strong, though. With that said, it’s time to launder your diapers. Turn the wet bag or diaper bin liner inside out to allow the diapers to fall into the wash without having to touch them. Make sure both pieces of the diaper are separated before laundering! We use this cycle: sanitary with a pre wash. The sanitary uses hot water and a high spin speed. Do what works best for your family and brand of diapers, but make sure to use a pre wash cycle.
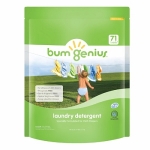
- We use the Bum Genius brand of detergent. I’m sure there are other viable options available as well. (Edit: We also use Rockin’ Green detergent now and love it as well! Amazon, baby.)
- We’ve always dried our Alva’s on a regular drying cycle. Hanging them outside in the sun, however, is a good way to release stains if you notice any. It also decreases your energy footprint, woot woot.
- Once dry, you can start alllllll over again at the “stuffing” stage!! 😉


I do so hope that you’ll consider using cloth on your wee one’s bum. The cost saving benefits alone are what convince most parents to make the complete switch or, at least, use cloth most of the time. We were lucky enough to have four sets of Alva pocket diapers gifted to us at the baby shower! By my estimates, we’ve spent around $150 on additional diapers, wet bags, cloth diaper detergent, and probably a few other pertinent items I’m forgetting. Compare that to the thousands we would have spent on disposables for twins. Keeping a bunch-a persistent synthetics and nutrient rich (thus, ecosystem disturbing) waste out of a landfill isn’t too shabby, either. Curse that environmental degree. I graduated with a pair of lenses that display my world in hues of what-does-this-action-affect and how-much-longer-do-we-have-til-Mars-is-more-habitable.
Do you use cloth? Are you thinking about it? I’d love to hear your experiences in the comments below. 🙂
And on that note, feel free to contact me with any Alva-related questions!

I loved Alva brand! Super informative post that I couldn’t agree more with. We actually switched to cloth when A kept getting diaper rash. Her skin is very sensitive and cloth gave us no issues!
LikeLiked by 1 person
AWEsome! I’ve heard that from a lot of parents actually. I always think about plastic versus soft cloth on my own bum haha… cloth would be my preference! 😉
LikeLike
Pingback: COVID-Chronicles: Week One, Son. | Homemade Jeli